
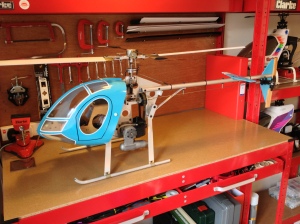
The MFA Sport 500 was first released in 1987 as a follow on from the MFA Hughes 500 kit (not to be confused with the later conversion kit for the Sport 500). In 1990 the collective version was released to keep up with the Japanese machines which favoured collective pitch as standard. The entire machine received a make over in 1994 as the Sport 500 MK2 with CNC cut wood parts, black anodizing, colourful stickers and more ball races. However by now the design of the Sport 500 was looking dated when placed alongside the moulded plastic machines of the 1990’s and production was phased out not long after (approx 1998). The U.S distributor Hobby Lobby International Inc. were still advertising the fixed pitch version on their website until 2005 indicating a considerable number had been shipped overseas.
Ruggedly built the Sport 500 was good at it’s job – teaching people to fly before the onset of flight simulators. It did have a few problems that seemed to be ‘universally’ suffered – however most of these problems were induced though a lack of experience on the owners part rather than the helicopter. On the flip side it could be argued that perhaps MFA’s designer Chris Baker had forgotten what it was like to be a newcomer to the hobby and took for granted many of the more specialist tools available on-hand to someone who’s been in the hobby for a while. Either way, when set up correctly they flew very well and parts were very very cheap. Many machines are still flying and it’s a testament to the machines likeability that a quarter of a century on there is still a big demand for second hand machines and parts. I hope this collection of literature I’ve compiled will help with your restoration/maintenance project of these unique British Helicopters:

MFA Sport 500 Manuals
- MFA Sport 500 Manual
- MFA Sport 500 Addendums
- MFA Sport 500 Collective Manual
- MFA Sport 500 Collective Conversion Manual
- MFA Hughes 500 Conversion Kit Manual
- MFA Blue Bird 46 Engine Instructions
MFA Sport 500 Figures
- MFA Sport 500 Parts Layout 01
- MFA Sport 500 Parts Layout 02
- MFA Sport 500 Collective Parts Layout
- MFA Sport 500 Decals
- MFA Sport 500 Wood Parts Template 01 (Horizontal Stabilizer F7)
- MFA Sport 500 Wood Parts Template 02 (Fixed Pitch Fin F6)
- MFA Sport 500 Wood Parts Template 03 (Fixed Pitch Top and Bottom Servo Trays F4 & F5)
- MFA Sport 500 Wood Parts Template 04 (Fixed Pitch Side Supports F2 & F3)
- MFA Sport 500 Wood Parts Template 05 (Main Former F1)
MFA Sport 500 Magazine Reviews (With Kind Permission of the Publishers)
- MFA Sport 500 First Impressions. Graham Brown. 1988. Radio Helicopter International
- MFA 500 Sport Review. Barry King. 1988. Radio Helicopter International
- MFA Sport 500 Review. Clive Thompson 1988. Model Helicopter World
- MFA Sport 500 Pursuing the Sport. Martin Briggs. 1988. Model Helicopter World
- MFA Sport 500 Collective Review. Phil Cranford. 1989. Radio Helicopter International
- MFA Sport 500 Improving Breed. John Bottomley 1989. Model Helicopter World
- MFA 500 Collective Review. Norman Streeter. 1990. Model Helicopter World
MFA Sport 500 Magazine/Brochure Adverts
- MFA Sport 500 ‘Intent to Release’ Advert 1987
- MFA Sport 500 Advert 1988 Page 1
- MFA Sport 500 Advert 1988 Page 2
- MFA Hughes 500 Conversion Kit 1988
- MFA Sport 500 Advert Middle 1989
- MFA Sport 500 Advert Late 1989
- MFA Sport 500 Helicopters Late Advert (1990+) Page 1
- MFA Sport 500 Helicopters Late Advert (1990+) Page 2
- MFA Sport 500 Collective Advert 1990
- MFA Sport 500 Collective Upgrade 1990
- MFA Sport 500 Helicopters Late Advert (1990+)
- MFA Sport 500 MK11 1994
Additional sources of MFA Sport 500 Knowledge
- MFA Sport 500 community page on Facebook.
- A useful 180° CCPM conversion trick for the collective version. This removes some of the servo strain and smooth’s up the collective operation considerably.
Some Personal Hints and Tips
- Metal to metal parts coming into contact with one another and limited scope for adjustment result in some components on the Sport 500 suffering from a short lifespan. Careful attention to maintenance is required. This need be nothing special and keeping the machine clean will usually highlight any potential problems while undertaking this chore.
- Keep that O-ring on the inner swashplate lubricated. Consider it expendable; particularly on the collective machines where it is required to operate as a bushing against the main shaft.
- If your machine is pre-1990 and has a Bowden cable push rod operating the tail, consider replacing it with a length of 18swg piano wire (or #H.103). This considerable improves the tail response.
- Don’t use Castor oil. I can’t understand why it’s still called the lubricant of choice by manufacturers and so called old hands. If it burns onto the engine so easily on the outside – how can it be claimed to be so tolerant of a hot and lean run on the inside?! Modern synthetic oils won’t leave unsightly burnt on stains, won’t dry as a sticky gooey mess and make it so much easier to keep everything clean. Want proof? Ask yourself why all the ‘experts’ models you see pictured in the magazines and flying on Youtube are always so clean and tidy? Notice that bottle of castor-free, synthetic lubricant based fuel in the background? – That’s why!
- Never use threadlock on the engine’s prop nut. Providing it’s tightened correctly it won’t be required and will only cause heartache when trying to dismantle later.
- If you don’t have a crank shaft lock, don’t insert anything metal into the engines openings and definitely don’t use a vice, mole grips or pliers to tighten the prop nut down onto the fan assembly. A simple alternative is to hydraulically lock the engine. With a glow plug inserted, the piston at bottom dead centre and the engine inverted, squirt fuel into the exhaust port and slowly turn the engine over using a socket wrench on the prop nut. It will either turn over or lock. If it turns over add more fuel this time and try again. It it locks, feel free to tighten the engine up. The engine is hydraulically locked, with the piston at or very near top dead centre, and is safe to tighten up against all you want without fear of bending the conrod (unless you use truly excessive force which aside from not being required, will also make dismantling the fan harder later on). Simply take out the glow plug when finished to release the fuel. Wear gloves for this and perform over the sink!

Thanks man this saved me a lot of time and I got some information that I probably never would have got anywhere else. I really appreciate this, nice work with the helicopters by the way 🙂
Pingback: MFA sport 500 nitro motor - Modelbouwforum.nl
Great site ! 🙂
Thank you I am fixing one up and you have put my mind at ease. But is the fly bar even on each side? Or is it of set?. As I got the fixed pich sport 500. And the fly bar is of to one side about one inch? If u can thank u.jason Davis.
Hi Jason,
I’m glad you liked my post. The fly bar should be even both sides and ideally should be balanced. I would remove the paddles and set the bar equal distance either side. Reattach the paddles and then balance, as per the instructions, by unbolting the head from the mast and letting the head assembly swing freely upside down as you hold the mast post (you can download a copy from my site if you haven’t got the manual https://extreme3d.files.wordpress.com/2013/04/mfa-sport-500-manual.pdf).
Pingback: 14: Gear’s Up! | extreme3d